What is linearisation?
The linearisation knowledge area answers questions about linearisation. Learn more about why linearisation should be performed and what the prerequisites are for performing linearisation.

What is linearisation?
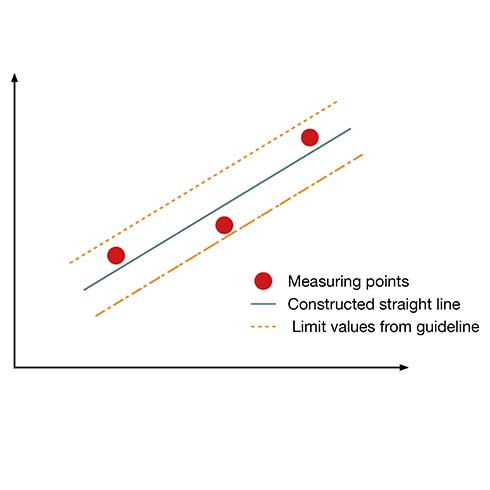
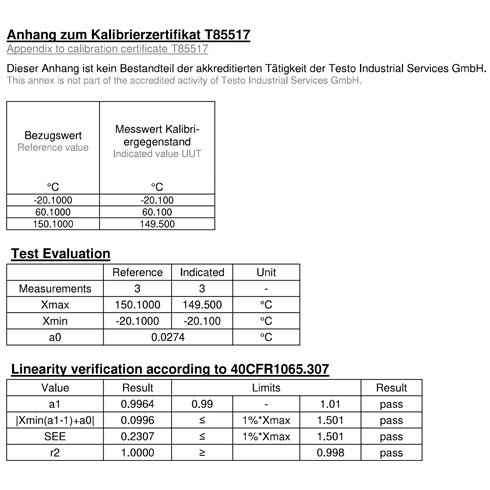
The aim of linearisation is to provide proof that the measuring instrument behaves linearly across its field of application. During the execution, a straight line is constructed from the measuring points of the calibration and checked to see how much the measuring points deviate from this constructed straight line. The guideline 40 CFR § 1065.307 specifies limit values for linearity, similar to the tolerance specification of a calibration. After linearisation, the customer receives an associated protocol in the appendix of the calibration certificate, in which the verification is documented with "pass" or "fail".
In which measurements is linearisation possible?
Linearisation is possible in all measured variables for both factory calibrations and accredited calibrations. However, the guideline 40 CFR § 1065.307 specifies limit values only for certain measured variables:
- Achievement
- Current
- Voltage
- Flow
- Pressure
- Dew point
- Temperature
How many measuring points are needed for linearisation?
How many measuring points are necessary for linearisation; this is precisely defined in the guideline. In the measured variables power, current, voltage, pressure, dew point and temperature, the minimum number is three measuring points, at flow rate, ten measuring points. At your request, we are happy to record more or less measuring points. However, it is not possible to perform a test correctly with less than three measuring points. Do you have any questions? We are happy to be there for you.
Which companies are obliged to linearise?
For companies from the automotive industry that want to sell their products on the American market, linearisation must be carried out in addition to the calibration of the measuring instruments according to the guideline 40 CRF § 1065.307. However, linearisation can generally be requested by all customers.

What does the information in the linearisation protocol mean?
- SEE = Standard Estimation -> "Error calculation"
- r² = measure of certainty
- A1 = slope of the constructed straight line
- A0 = intersection with the Y-axis
- Xmin/Xmax = Smallest/Largest deviation from zero
- Pass = values are within the linearization values